
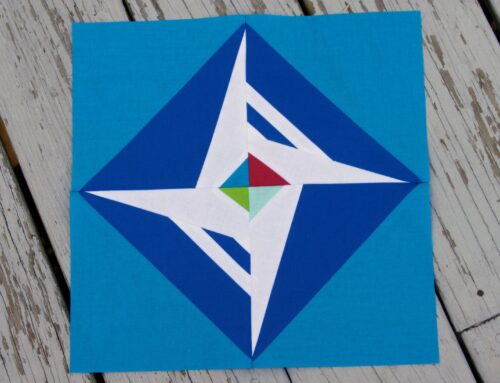
 Thank you so much for joining me on the Cloud9 2016 New Block Blog Hop! I have to say, I am absolutely thrilled to share this tutorial with you! I loved, loved, loved working with these Cloud9 fabrics from the Organic Cirrus Solids collection! They handled beautifully, and have a great look and texture! The block tutorial I created for you was inspired by another project I’ve been working on this summer. It’s been a summer of arrow tails and seeking growth in many directions! Thus, the name, Heading Out!
Let’s get started!
Supplies:
Cloud9 Fabrics in these colors: Amazon, Sky, Lilac, Iris and Shadow.
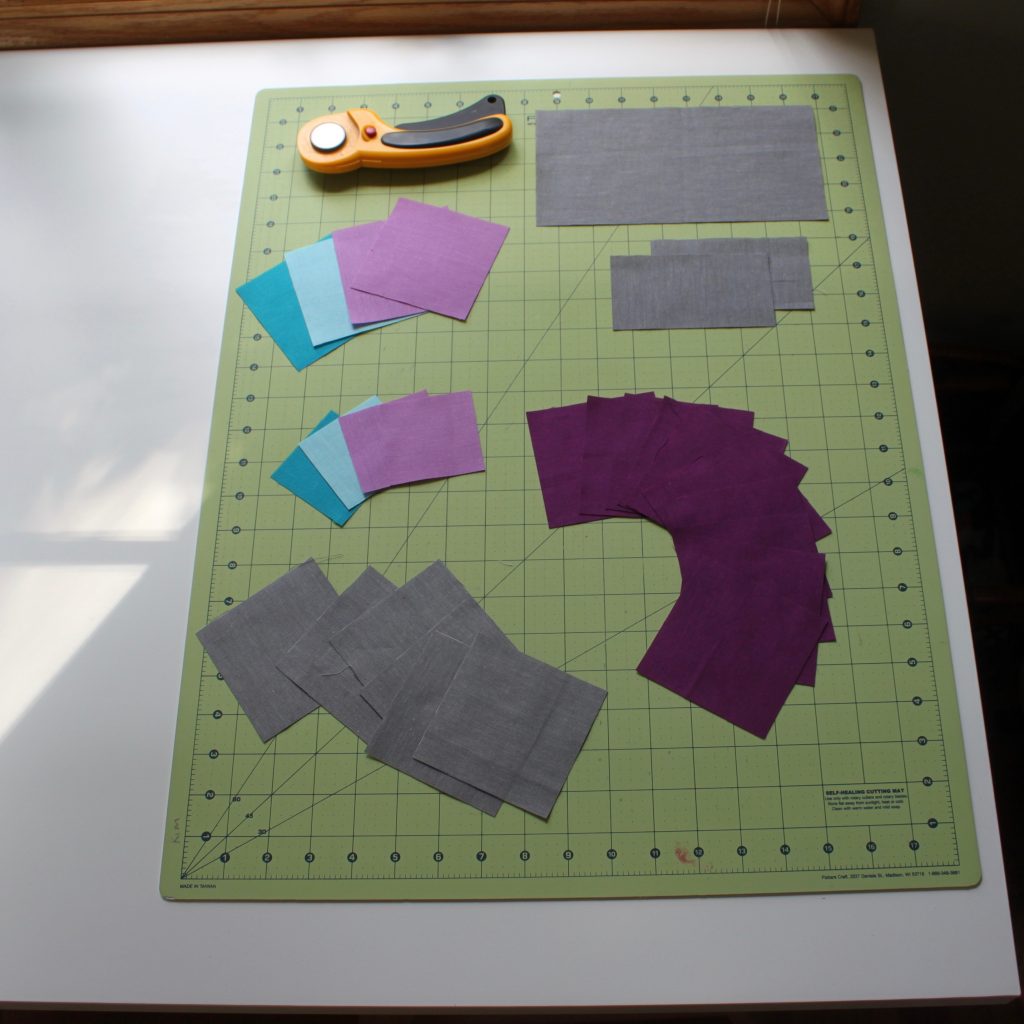
You will need to cut:
From the Amazon fabric:
(1) 2.5″ square
(1) 3.5″ square
From the Sky fabric:
(1) 2.5″ square
(1) 3.5″ square
From the Lilac fabric:
(2) 2.5″ squares
(2) 3.5″ squares
From the Iris fabric
(10) 3.5″ squares
From the Shadow fabric:
(1) 4.5 x 8.5″ rectangle
(6) 3.5″ squares
(2) 2.5 x 4.5″ strips
You will also need a rotary cutter, self healing mat, ruler and a pen for marking. All seam allowances are 1/4″. Unfinished block will measure 12 1/2″ square.
The How-To:
Step 1. Make the Half-Square Triangles (HSTs)
 Using your pen, draw a diagonal line from corner to corner on the back side of all 3.5″ Iris squares.

Place each of these squares directly on top of the 3.5″ Amazon, Sky and Lilac and Shadow squares (rights sides together if you are using a print).

Sew a seam 1/4″ on either side of the marked diagonal line. Repeat for each square. (Tip 1: you can chain-piece this step to make it go faster! And Tip 2: Don’t worry about pinning your pieces. Because the squares are oversized, even if the fabric shifts a bit while sewing, they will still be perfect when we trim them down to size!)

Cut each of the sewn pairs on the marked line.

Press the seams open.

Trim each HST to 2.5″ square.
Step 2. Assemble the arrow tails.

Sew the 2.5″ Amazon block to an Amazon/Iris HST as shown.

Sew an Iris/Shadow HST to an Amazon/Iris HST as shown. Press seams open.

Sew the two sets of squares together, as shown, to form an arrow tail. Press seams open.

Repeat this step with the additional Lilac and Sky sets of squares.

You will end up with two Iris, one Sky, and one Amazon arrow tail.
Step 3. Assemble the Flying Geese.

Sew two Iris/Shadow HSTs together to form a Shadow flying geese triangle. Repeat 3 more times.

Sew a 2.5 x 4.5″ Shadow strip to the bottom of each of two flying geese. You will have two Flying Geese and two Flying Geese Units.
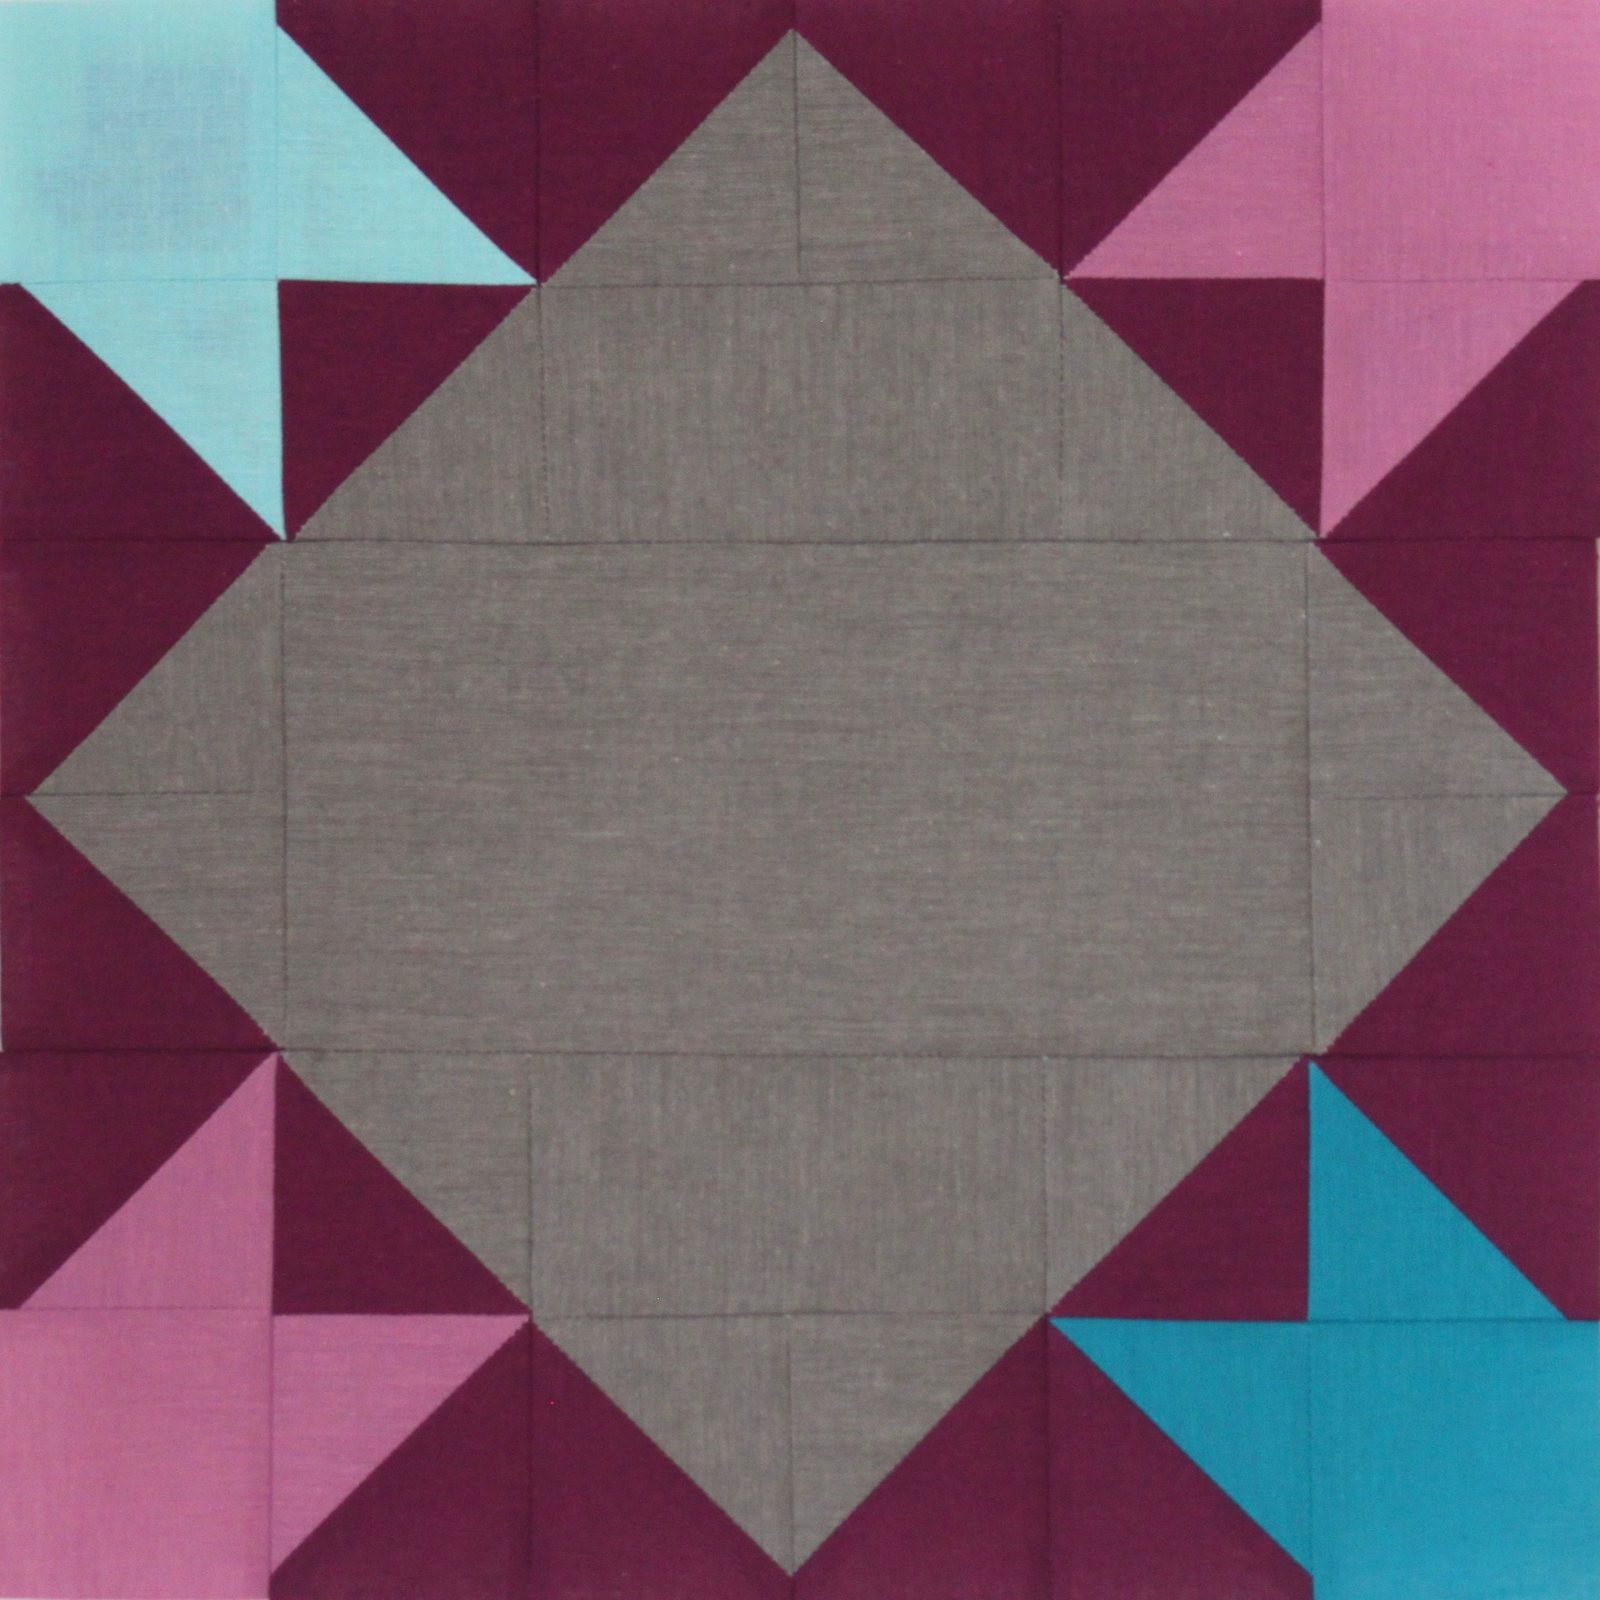
Step 4. Assemble the Block.

With the flying geese nose pointing upward, sew a Sky Arrow Tail to the left side of a Flying Geese Unit and a Lilac arrow tail to the right side of the Flying Geese Unit, as shown. This will create the top row of your block.

Sew a Flying Geese (noses pointed outward) to either short end of the 4.5 x 8.5″ Shadow piece. This will create the center row of your block.

With the flying geese nose pointing down, sew a Lilac Arrow Tail to the left side of the remaining Flying Geese Unit and an Amazon Arrow Tail to the right side of the flying geese unit. This will create the bottom row of your block.

Press all seams open. Then, sew the rows together as shown below.

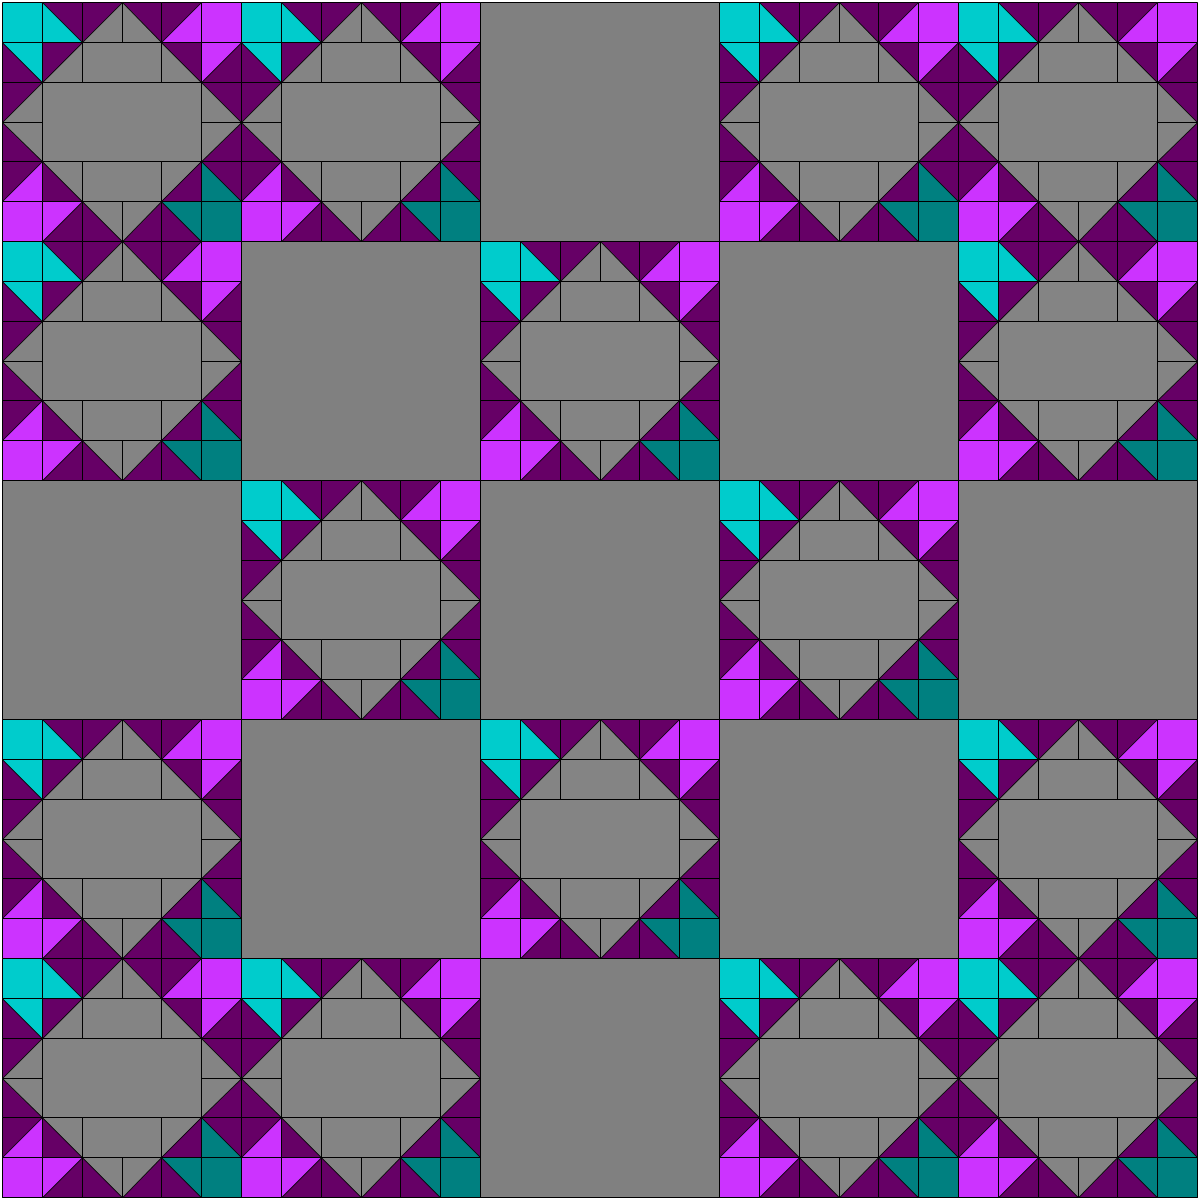
And you are done! So easy! If you want to use this block to make a quilt, here’s a sample layout! In order to preserve the appearance of the arrow tails, I have added a spacer block to prevent the arrow tails from getting lost as stars:
I hope you’ve enjoyed this quilt block tutorial, and I appreciate you stopping by!
Please make sure to visit all of the other bloggers participating in the block hop today (listed below). And a huge thanks to all of our hosts: Yvonne @Quilting Jet Girl, Cheryl @Meadow Mist Designs, and Stephanie @Late Night Quilter.
Host: Yvonne @Quilting Jetgirl
Abigail @Cut & Alter
Janice @Color, Creating, and Quilting!
Lorinda @Laurel, Poppy, and Pine
Melva @Melva Loves Scraps
Renee @Quilts of a Feather
Kathryn @Upitis Quilts
Kim @Leland Ave Studios
Amanda @this mom quilts
Holly @Lighthouse Lane Designs
Irene @Patchwork and Pastry
Jennifer @Dizzy Quilter
Karen @Tu-Na Quilts, Travels, and Eats
Anne @Said With Love
Suzy @Adventurous Applique and Quilting
Sharla @Thistle Thicket Studio
Kathleen @Smiles From Kate
Amanda @Gypsy Moon Quilt Co.
Sarah @Sarah Goer Quilts
Chelsea @Patch the Giraffe
Jinger @Trials of a Newbie Quilter
Anja @Anja Quilts
Daisy @Ants to Sugar
46 Comments
Comments are closed.
[…] Poppy, and Pine Melva @Melva Loves Scraps Renee @Quilts of a Feather Kathryn @Upitis Quilts Kim @Leland Ave Studios Amanda @this mom quilts Holly @Lighthouse Lane Designs Irene @Patchwork and Pastry Jennifer @Dizzy […]
Great block! I love your sample layout. And I love how the centers of your block could feature some great free motion quilting!
Lovely block. I agree with Sarah, for those who like FMQ this will offer some great opportunities in a quilt, especially in your suggested layout. Well done.
Hi – I’m visiting for the first time from the Blog Hop. What a great block! It looks really versatile and I love the mock up you have made. Like Sarah said the plain parts of the quilt could have some gorgeous quilting in.
Nice, nice, nice. Well done. Love the tutorial too.
Nice block, Kim! I love the secondary patterns it creates.
[…] Poppy, and Pine Melva @Melva Loves Scraps Renee @Quilts of a Feather Kathryn @Upitis Quilts Kim @Leland Ave Studios Amanda @this mom quilts Holly @Lighthouse Lane Designs Irene @Patchwork and Pastry Karen @Tu-Na […]
Wonderful tutorial. I like all the minimalism in this quilt which make the colours pop.
I really like your block! Nice tutorial.
Love your block and the tutorial. Many thanks!
[…] Poppy, and Pine Melva @Melva Loves Scraps Renee @Quilts of a Feather Kathryn @Upitis Quilts Kim @Leland Ave Studios Amanda @this mom quilts Holly @Lighthouse Lane Designs Irene @Patchwork and Pastry Jennifer @Dizzy […]
I love this and the quilt layout is stunning!!
Very pretty. This has a lot of potential. I wonder what a monochromatic version would look like =)
I really can see how your work this summer influenced this block, and I love the name you came up with for it! The spacing in the quilt layout really helps give the block definition, too. Thank you so much for joining the hop!
This is wonderful!! You did a great job…the fabric was so inspiring to work with!
Nice quilt layout and you did a wonderful job in your tutorial. Seeing the variety of blocks created by everyone has been fun.
I love your block and your quilt layout! I can see a lot of possibilities with this one!
Great use of HST! The tiling options are really neat too, I love the stars in the corners!
[…] Poppy, and Pine Melva @Melva Loves Scraps Renee @Quilts of a Feather Kathryn @Upitis Quilts Kim @Leland Ave Studios Amanda @this mom quilts Holly @Lighthouse Lane Designs Irene @Patchwork and Pastry Jennifer @Dizzy […]
Great block and your sample layout is very pretty!
Pretty colors and a great tutorial for an interesting block. Thanks for sharing.
I love it! Your tutorial and photos are really well done, and the block is gorgeous.
Great block! I really like the idea of the spacer block when laying out the whole quilt. It adds a lot to it.
Super cool block! Love it
[…] Poppy, and Pine Melva @Melva Loves Scraps Renee @Quilts of a Feather Kathryn @Upitis Quilts Kim @Leland Ave Studios Amanda @this mom quilts Holly @Lighthouse Lane Designs Irene @Patchwork and Pastry Jennifer @Dizzy […]
Very lovely block and the tutorial so clearly written ??
Challenging, but minimalist! Very cool. I think I would enjoy making this block. I loved the fabrics too, especially the grey – lovely. Good to hear from you!
Oh I want to change my website address on here.
I love how clean your block looks! Beautiful work and your photos are fantastic!
Very nice block. I like that you added solid blocks in the layout.
Great block, and even better layout into the larger quilt. It is really beautiful. Really nice work.
Great block!! I think it would look great as stars too! Love the secondary pattern this one creates (current obsession!) and with the spacer blocks. Thanks for including the full quilt too.
Awesome! The colours are gorgeous and your block really shows them off. I love how in your full quilt layout you have the blocks massed around the corners – that makes such a great pattern across the quilt.
Great block! Awesome layout with lots of room for free motion or straight line quilting.
I’m really in awe as to how different the blocks are and the beautiful colors will make a grant quilt!
I just love a block that involves HSTs! And this one looks soooo fun :)
What a wonderful block with lots of negative space!
[…] Poppy, and Pine Melva @Melva Loves Scraps Renee @Quilts of a Feather Kathryn @Upitis Quilts Kim @Leland Ave Studios Amanda @this mom quilts Holly @Lighthouse Lane Designs Irene @Patchwork and Pastry Jennifer @Dizzy […]
I think the secondary pattern of stars is pretty cool too even though, as you say, the arrow tails get lost. Wonderful design!! Stars or tails, either one!
[…] Poppy, and Pine Melva @Melva Loves Scraps Renee @Quilts of a Feather Kathryn @Upitis Quilts Kim @Leland Ave Studios Amanda @this mom quilts Holly @Lighthouse Lane Designs Irene @Patchwork and Pastry Jennifer @Dizzy […]
Great block, and when laid out in a quilt it’s so lovely! I don’t think placing the blocks together to create the secondary pattern is necessarily a bad thing, but when placed next to spacers, the design becomes really interesting! Great job!
A great block! Love the tutorial …. you make it look so easy!
Barbara @ The Flashing Scissors
This is a great looking block! Thanks so much for sharing it. After designing my block for this hop, I have a new appreciation for pattern designers! I also like that you included a layout suggestion. It’s always nice not to have to guess how a bunch of these blocks would look put together in a quilt. I would have never guessed that putting them together without a plain square would have created a star. Thanks again!
[…] Poppy, and Pine Melva @Melva Loves Scraps Renee @Quilts of a Feather Kathryn @Upitis Quilts Kim @Leland Ave Studios Amanda @this mom quilts Holly @Lighthouse Lane Designs Irene @Patchwork and Pastry Jennifer @Dizzy […]
The block is really cool and I love how it combines with other blocks in the quilt top.
[…] Poppy, and Pine Melva @Melva Loves Scraps Renee @Quilts of a Feather Kathryn @Upitis Quilts Kim @Leland Ave Studios Amanda @this mom quilts Holly @Lighthouse Lane Designs Irene @Patchwork and Pastry Jennifer @Dizzy […]